layout: post title: Activiti 5 with Spring Integration 2.0 Mail Adapter tags: [enterprise-integration, activiti, bpm] —
Activiti is an open source BPM and workflow system. The first GA release is expected to be out next month i.e. Dec 2010. The roadmap of activiti looks very promising and also involvement of companies like SpringSource and MuleSoft can make it even more interesting. There are couple of good http://docs.codehaus.org/display/ACT/Presentations+and+Articles[articles] and tutorials available on the wiki to help you get started with activiti. To get a feel of the framework, instead of developing a simple hello world app, I thought of integrating activiti with Spring Integration. SpringSource team is working on this integration module and once that is in place some of the boilerplate code from my prototype would be cleaned up. The following blog post demonstrates the use of spring integration mail module with activiti.
Business Process
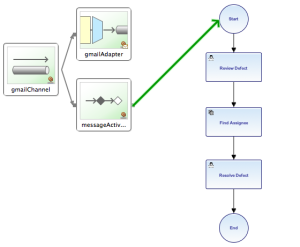
For the sake of prototype, I created a defect tracking application. Users can send their complaints to a specific email address e.g. helpdesk@xyz.com. The application polls on helpdesk’s mailbox using spring integration mail module. Once email is received, a defect is created and workflow is initiated to handle this defect.

Running the Demo
The source code for the prototype is available at google code and github. Checkout the sources. Modify the database and mail configurations in activiti.properties. Run the app using embedded jetty server with mvn jetty:run. Run data.sql to create test users. Send a mail to the address configured in activiti.properties {gmail.username}. All defects are assigned by default to manager user. Login to the app using manager/password. You would see the defect in your task list for review. You can click on the review link, see the details of the defect and assign it to a different user (e.g. developer). Once you assign the defect to a different user, your task list would be empty :-). Now login as developer/password to resolve the defect.

Understanding the Code
Maven Dependencies
<!-- ACTIVITI DEPENDENCIES -->
<dependency>
    <groupId>org.activiti</groupId>
    <artifactId>activiti-engine</artifactId>
    <version>${activiti.version}</version>
</dependency>
<dependency>
    <groupId>org.activiti</groupId>
    <artifactId>activiti-spring</artifactId>
    <version>${activiti.version}</version>
</dependency>
Wiring it up with Spring
<!-- Activiti Beans -->
<bean id="processEngine" class="org.activiti.spring.ProcessEngineFactoryBean"
    p:databaseType="${database}" p:dataSource-ref="dataSource"
    p:transactionManager-ref="transactionManager" p:dbSchemaStrategy="${db.schema.strategy}"
    p:jpaEntityManagerFactory-ref="entityManagerFactory"
    p:jpaCloseEntityManager="true" p:jpaHandleTransaction="true" />

<bean id="repositoryService" factory-bean="processEngine"
    factory-method="getRepositoryService" />
<bean id="runtimeService" factory-bean="processEngine"
    factory-method="getRuntimeService" />
<bean id="taskService" factory-bean="processEngine"
    factory-method="getTaskService" />
<bean id="historyService" factory-bean="processEngine"
    factory-method="getHistoryService" />
<bean id="managementService" factory-bean="processEngine"
    factory-method="getManagementService" />
If you take a look at my previous blog post about jBPM, you would clearly see the simplicity in configurations with activiti.
Spring Integration Configurations
<!-- ========================================================= -->
<!-- ===== Spring Integration Setup for Receiving Email Messages ===== -->
<!-- ========================================================= -->

<util:properties id="javaMailProperties">
    <prop key="mail.imap.socketFactory.class">javax.net.ssl.SSLSocketFactory</prop>
    <prop key="mail.imap.socketFactory.fallback">false</prop>
    <prop key="mail.store.protocol">imaps</prop>
    <prop key="mail.debug">false</prop>
</util:properties>

<int-mail:imap-idle-channel-adapter
    id="gmailAdapter"
    store-uri="imaps://${gmail.username}:${gmail.password}@imap.gmail.com:993/inbox"
    channel="gmailChannel" auto-startup="true" should-delete-messages="false"
    java-mail-properties="javaMailProperties" />

<int:channel id="gmailChannel" />

<int:service-activator id="messageActivator"
    input-channel="gmailChannel" ref="gmailMessageActivator" method="process">
</int:service-activator>
Understanding Service Activator and DefectService
The GmailMessageActivator bean receives the mime message. It extracts the information from the message and calls the DefectService to create the defect. In the current prototype, the process kick off is done in the DefectService. DefectService uses the activiti query API for dealing with tasks and process instances.
@Component("gmailMessageActivator")
public class GmailMessageActivator {

    @Autowired
    DefectService defectService;

    @Transactional(readOnly = false)
    public void process(MimeMessage mimeMessage) throws Exception {
        try {
            String[] fromHeaders = mimeMessage.getHeader("From");
            String from = "";
            if (fromHeaders != null && fromHeaders.length > 0) {
                from = fromHeaders[0];
            }
            Defect defect = new Defect();
            defect.setDescription(mimeMessage.getSubject());
            defect.setCreatedBy(from);
            defect.setAssignedTo("manager");
            defectService.createDefect(defect);
        }
        catch (MessagingException e) {
            throw new Exception("Exception occurred during message receiption ", e);
        }
    }
}
//Note: checkout project for entire source

 @Autowired
 private DefectRepository defectRepository;
 @Autowired
 private RuntimeService runtimeService;
 @Autowired
 private RepositoryService repositoryService;
 @Autowired
 private TaskService taskService;

 @PostConstruct
 public void setupProcessDefinitions() {
     try {
         for (String processDefinition : processDefinitions) {
             repositoryService.createDeployment()
                     .addInputStream(processDefinition, new ClassPathResource(processDefinition).getInputStream())
                     .deploy();
         }
     }
     catch (Exception e) {
         throw new RuntimeException("An error occured while trying to deploy a process definition", e);
     }
 }

 @Override
 @Transactional(readOnly = false)
 public Defect createDefect(Defect defect) {
     defect.setCreatedDate(new LocalDate());
     defect.setStatus(DefectStatus.NEW);
     Defect newDefect = defectRepository.save(defect);

     Map<String, Object> vars = new HashMap<String, Object>();
     vars.put("defectId", newDefect.getId());
     vars.put("assignee", defect.getAssignedTo());
     runtimeService.startProcessInstanceByKey(DEFECT_TRACKING_PROCESS_KEY, newDefect.getId().toString(), vars);
     return defect;
 }
Understanding BPMN2.0 constructs
A user task is used to model work that is to be done by human. When process execution arrives at this point in the flow, a new task is created in the user’s task list.
<userTask name="reviewDefect" id="reviewDefect">
    <documentation>
        The assignee will review the defect.
    </documentation>
    <humanPerformer>
        <resourceAssignmentExpression>
            <formalExpression>#{assignee}</formalExpression>
        </resourceAssignmentExpression>
    </humanPerformer>
</userTask>
A service task is used to execute some business logic when process execution arrives at a particular point.
<serviceTask id="findAssignee"
    activiti:class="net.arunoday.activiti.demo.handler.CheckAssignee" />
Conclusion
In the above blog post, I demonstrated how to setup activiti and use it along with spring integration mail module. The configurations required to setup activiti are pretty simple. To get better understanding of the framework, its wise to quickly read the sources from activiti-engine module. Also, while you run the demo app, check the data in the activiti configuration tables and see how data flows from current tables to history tables after successful execution of the process. This data can be used to generate reports.
It would be interesting to see activiti getting feature rich and then answers to questions like “whether existing jBPM apps should continue with it or consider migrating to activiti?”, “whether new developments should be done with activiti or jBPM?” would come with ease :-)!!