Recently I was playing around with Spring Integration. To understand any new framework one cannot just rely on documentation. So I created a demo application to try out different features of the framework. Since my main motivation was to understand Spring Integration framework, I wanted to spend minimal efforts in input data generation. So I decided to work with Twitter messages.
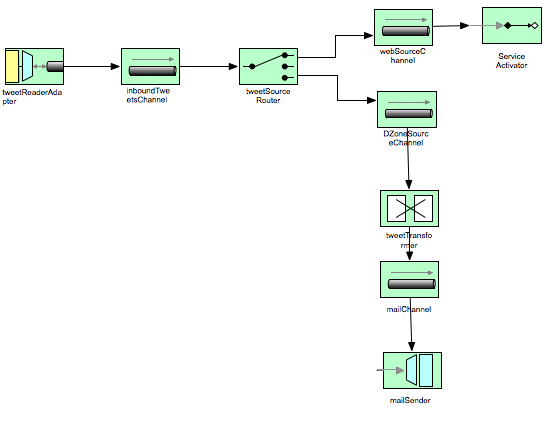
Most of you must be familiar with Twitter. Twitter is a service for friends, family, and co–workers to communicate and stay connected through the exchange of quick, frequent messages. There are different clients available to use Twitter. In the sample application, I first read the friends timeline. Then based on the source/client used for tweeting, the tweets are routed to different channels. The tweets originated from “web” are simply logged, while the tweets originated from “Dzone.com” are dispatched using a mail sender. The basic flow of the application is depicted in the following diagram.

Twitter4J
Twitter4J is a java library for Twitter API. With Twitter4J, you can easily integrate your Java application with the Twitter service. Twitter4J provides a wrapper around the REST API exposed by Twitter to allow users to interact with the system.
Spring Integration:
Spring Integration framework allows applications to decouple from one another and enable them to share services and data. Though the functionality provided by SI is similar to most of the ESB’, the key difference between Spring Integration and ESB is that you deploy Spring Integration into your application; while with ESB’ you deploy application onto the standalone ESB.
Components Used
There are variety of Enterprise Integration components provided by Spring Integration. Here I would give a brief introduction about the components used to build this sample application.
- Message – Contains Payload and header information needed for communication
- MessageChannel – Used for data transport between different messaging components
- ChannelAdapter – Knows how to speak to a specific type of subsystem
- Service Activator – Allows you to invoke application’s business logic on receipt of a message
- Transformer – Converts message structure / content and returns the modified message
- Router – Decides which channel should receive the message based on message content or header information
Now that we have some understanding about the toolset and application domain, we can get started with building the application.
TweetReaderAdapter
An adapter is required to read data from external source, in this case Twitter. To build an adapter you can create a class that implements MessageSource interface. If you are using third party implementation for reading data, then you can simply specify the method which should be used for receiving messages. In our case, we implement MessageSource. The poller is configured to run every 10seconds and fetch maximum 100tweets during each polling cycle. Twitter has some limitations on no. of API invocations per hour. So to avoid exceeding rate limits, the polling interval is set to 10seconds.
<!-- STEP 1 -->
<!--  Reads tweets from Twitter using Twitter4J -->
<beans:bean id="tweetReader"
    class="net.arunoday.springintegration.twitter.TwitterMessageSource"
    p:password="${twitter.password}" p:userId="${twitter.userId}" />

<channel id="inboundTweetsChannel" />

<!-- Channel Adapter to poll twitter for new tweets -->
<inbound-channel-adapter id="tweetReaderAdapter"
    ref="tweetReader" channel="inboundTweetsChannel">
    <poller receive-timeout="10000" max-messages-per-poll="100">
        <interval-trigger time-unit="SECONDS" interval="10" />
    </poller>
</inbound-channel-adapter>
TweetSourceRouter
Now that we have read the tweets from Twitter, we want to identify tweets based on the source or the client used. HeaderValueRouter is the default router implementation provided by the framework. It routes the messages to different channels by inspecting the value of specified header. In our case, we use tweet “source”. If the source is “web” we route the messages to webSourceChannel while for “DZone.com” we route it to DZoneSourceChannel. When a new tweet arrives on webSourceChannel, service activator invokes the webMessageProcessor which simply logs the tweet details and maintains the total no. of tweets sent using web interface.
<!-- STEP 2 -->
<!-- Based on source route tweets to different channels -->
<header-value-router id="tweetSourceRouter"
    input-channel="inboundTweetsChannel" header-name="source">
    <mapping value="DZone.com" channel="DZoneSourceChannel" />
    <mapping value="web" channel="webSourceChannel" />
</header-value-router>

<channel id="DZoneSourceChannel" />
<channel id="webSourceChannel" />

<!-- Simply logs the tweets received on web channel -->
<beans:bean id="webMessageProcessor"
    class="net.arunoday.springintegration.twitter.WebMessageProcessor" />

<service-activator input-channel="webSourceChannel"
    ref="webMessageProcessor" method="announce" />
TweetTransformer
For the tweets sent using DZone.com, we want those tweets to be emailed to a specific email address so that user can immediately read those articles. The payload received on DZoneSourceChannel is of type Tweet. First we need to convert this Tweet object to MailMessage with appropriate header values. This converted payload is then dispatched on mailChannel. The mail outbound adapter then sends this message using MailSender.
<!-- STEP 3 -->
<!-- Transforms the tweet into MailMessage -->
<transformer input-channel="DZoneSourceChannel"
    output-channel="mailChannel" ref="tweetTransformer" />

<channel id="mailChannel" />

<!-- Sends tweets from DZone to Gmail -->
<mail:outbound-channel-adapter channel="mailChannel"
    mail-sender="mailSender" />

<beans:bean id="tweetTransformer"
    class="net.arunoday.springintegration.twitter.TweetTransformer">
    <beans:property name="mailMessage" ref="mailMessage" />
</beans:bean>
Email Setup
<!-- Email SetUp -->
<beans:bean id="mailSender"
    class="org.springframework.mail.javamail.JavaMailSenderImpl">
    <beans:property name="host" value="smtp.gmail.com" />
    <beans:property name="port" value="25" />
    <beans:property name="username" value="${gmail.username}" />
    <beans:property name="password" value="${gmail.password}" />
    <beans:property name="javaMailProperties">
        <beans:props>
            <beans:prop key="mail.smtp.starttls.enable">true</beans:prop>
            <!-- Use SMTP-AUTH to authenticate to SMTP server -->
            <beans:prop key="mail.smtp.auth">true</beans:prop>
            <!-- Use TLS to encrypt communication with SMTP server -->
            <beans:prop key="mail.smtp.starttls.enable">true</beans:prop>
        </beans:props>
    </beans:property>
</beans:bean>

<!-- Mail message -->
<beans:bean id="mailMessage" class="org.springframework.mail.SimpleMailMessage">
    <beans:property name="from">
        <beans:value><![CDATA[Twitter-SI-Demo <spring-integ@example.org>]]></beans:value>
    </beans:property>
    <beans:property name="to">
        <beans:value><![CDATA[Aparna Chaudhary <aparna.chaudhary@gmail.com>]]></beans:value>
    </beans:property>
    <beans:property name="subject" value="New Article on DZone" />
</beans:bean>
Conclusion
In this post, I have showed you how we can use Spring Integration to integrate with Twitter. The application demonstrates how to use Channel Adapters, Routers, Transformers, Service Activators. Use of Spring Integration makes the application quite flexible which allows easy adaption of changes in business requirements.